Quickstart guide to GitLab CI/CD Pipeline
There are many DevOps lifecycle tools out there, however GitLab is a complete package designed for coordinating CI/CD pipelines.
GitLab is a web-based DevOps lifecycle tool. This application offers functionality to automate the entire DevOps life cycle from planning to creation, build, verify, security testing, deploying, and monitoring, offering high availability and replication. It is highly scalable and can be used on-prem or on the cloud. GitLab also includes a wiki, issue-tracking, and CI/CD pipeline features.
When DevOps projects are spread across large, geographically dispersed teams a complete DevOps tool is highly useful to maintain collaboration, incorporate feedback, avoid mistakes, and speed up the development process.
GitLab goes beyond being just a repository manager; it has a built-in CI/CD, which saves enormous amounts of time and keeps the workflow smooth. Along with its own CI/CD, GitLab also allows for a range of 3rd party integrations with external CI, so you always have the option of working with the tools based on your workflow.
Here is a quick run-through on how to start with GitLab.
Project:
In GitLab, we can create projects for hosting codebase, use it as an issue tracker, collaborate on code, and continuously build, test, and deploy apps with built-in GitLab CI/CD. Projects can be available publicly, internally, or privately, at our choice. GitLab does not limit the number of private projects we create.
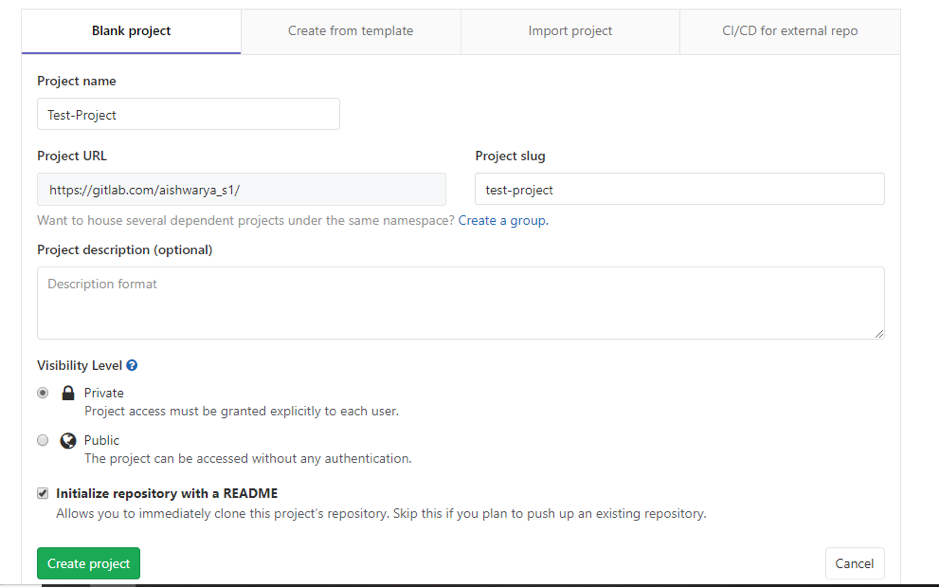
Create a project in GitLab
In the dashboard, click the green “New project” button or use the plus icon in the navigation bar. This opens the New Project page.
On the New Project page :
- Create a Blank project
- Fill the name of your project in the Project name field
- Project URL Field which is the URL path for the project that the GitLab instance will use
- Project slug field will be auto-populated
- The Project description (optional) field enables you to enter a description for the project’s dashboard
- Changing the Visibility Level modifies the project’s viewing and access rights for users
- Selecting the Initialize repository with a README option creates a README file so that the Git repository is initialized, has a default branch, and can be cloned
- Click Create project
Repository
A repository is a part of a project, which has a lot of other features.
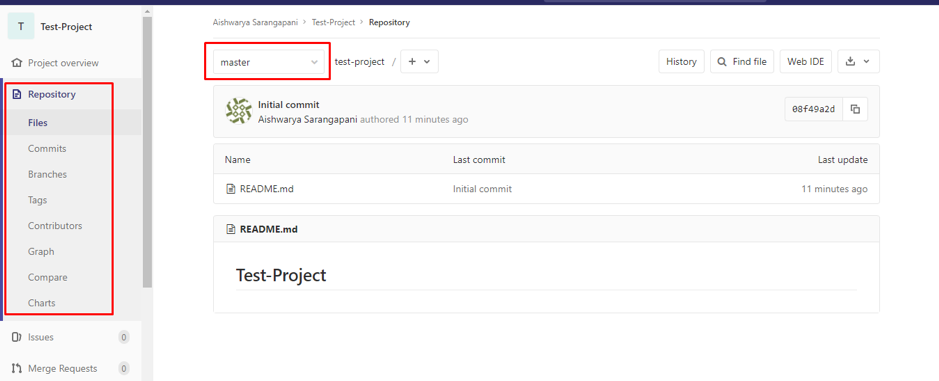
Host your codebase in GitLab repositories by pushing files to GitLab. You can either use the user interface (UI) or connect your local computer with GitLab through the command line.
GitLab Basic Commands: https://docs.gitlab.com/ee/gitlab-basics/command-line-commands.html
Branch
When you create a new project, GitLab sets the master as the default branch for your project. You can choose another branch to be your project’s default under your project’s Settings > Repository.
Commits
When you commit your changes, you are introducing those changes to your branch. Via a command line, you can commit multiple times before pushing.
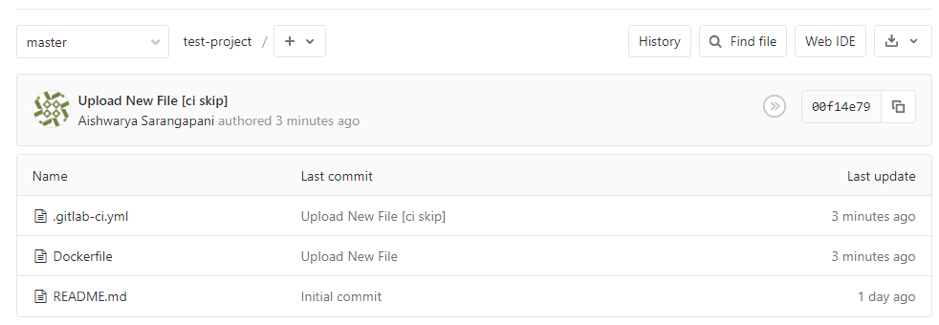
A commit message is important to identify what is being changed and, more importantly, why. In GitLab, you can add keywords to the commit message that will perform one of the actions below:
- Trigger a GitLab CI/CD pipeline: If you have your project configured with GitLab CI/CD, you will trigger a pipeline per push, not per commit.
- Skip pipelines: You can add to you commit message the keyword [ci skip], and GitLab CI will skip that pipeline.
- Cross-link issues and merge requests: Cross-linking is great to keep track of what’s somehow related in your workflow. If you mention an issue or a merge request in a commit message, they will be shown on their respective thread.
CI/CD Pipeline
Continuous Integration works by pushing small code chunks to your application’s code base hosted in a Git repository, and, to every push, run a pipeline of scripts to build, test, and validate the code changes before merging them into the main branch.
Continuous Delivery and Deployment consist of a step further CI, deploying your application to production at every push to the default branch of the repository.
These methodologies allow you to catch bugs and errors early in the development cycle, ensuring that all the code deployed to production complies with the code standards you established for your app.
Two top-level components are:
- .gitlab-ci.yml
- GitLab Runner
.gitlab-ci.yml
The .gitlab-ci.yml file is where we configure what CI does with the project. It lives in the root of the repository. On any push to the repository, GitLab will look for the .gitlab-ci.yml file and start jobs on Runners according to the contents of the file, for that commit.
Pipeline configuration begins with jobs. Jobs are the most fundamental element of a .gitlab-ci.yml file.
Jobs are:
- Defined with constraints stating under what conditions they should be executed
- Top-level elements with an arbitrary name and must contain at least the script clause
- Not limited in how many can be defined
For example:
job1:
script: “execute-script-for-job1”
job2:
script: “execute-script-for-job2”
GitLab Runner
GitLab Runner is a build instance that is used to run jobs and send the results back to GitLab. It is designed to run on the GNU/Linux, macOS, and Windows operating systems.
Runners run the code defined in .gitlab-ci.yml. They are isolated (virtual) machines that pick-up jobs through the coordinator API of GitLab CI. If we want to use Docker, install the latest version. GitLab Runner requires a minimum of Docker v1.13.0.
Types of Runner :
- Specific Runner – useful for jobs that have special requirements or for projects with a specific demand.
- Shared Runner – useful for jobs that have similar requirements between multiple projects. Rather than having multiple Runners idling for many projects, you can have a single or a small number of Runners that handle multiple projects.
- Group Runner – useful when you have multiple projects under one group and would like all projects to have access to a set of Runners. Group Runners process jobs using a FIFO (First In, First Out) queue.
How to use Runner:
- Install Runner – https://docs.gitlab.com/runner/#install-gitlab-runner
- Register Runner – https://docs.gitlab.com/runner/register/index.html
Sample Docker Project:
- Create/Upload 2 files. .gitlab-ci.yml and Dockerfile
File Contents:
.gitlab-ci.yml:

# Official docker image.
image: docker:19.03.0-dind

services:
  - docker:19.03.0-dind

before_script:
  - docker login -u "$CI_REGISTRY_USER" -p "$CI_REGISTRY_PASSWORD" $CI_REGISTRY

build-master:
  stage: build
  script:
    - docker build --pull -t "$CI_REGISTRY_IMAGE" .
    - docker push "$CI_REGISTRY_IMAGE"
  tags:
    - docker
Dockerfile
FROM python:2.7
RUN pip install howdoi
CMD ['howdoi']
Once we create .gitlab-ci.yml file, each push will trigger the pipeline. We didn’t create the Runner yet. So, while creating these files, add “[ci skip]” to commit message. This will skip the CI/CD pipeline.
2. Install Runner
For this example, we are using a specific runner and are going to install a runner in Windows. Refer to this link to Install Runner in Windows: https://docs.gitlab.com/runner/install/windows.html
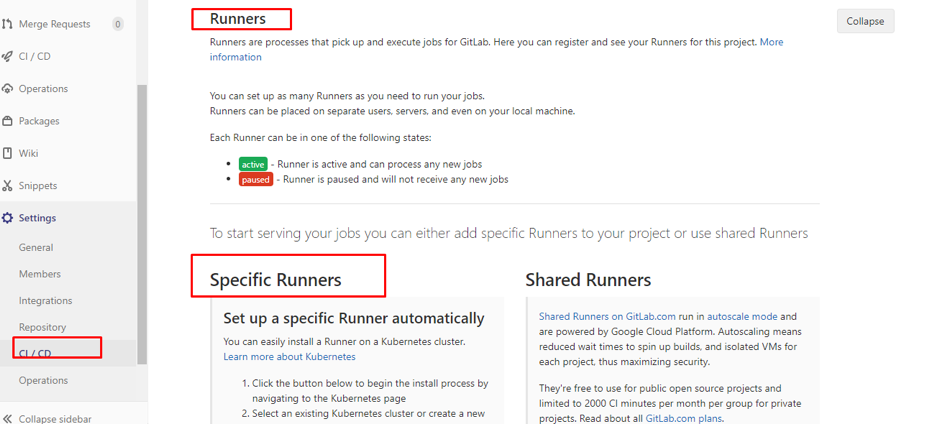
3. Register Runner:
In order to register a runner, we need a registration token which can be found in Settings > CI/CD > Runner Tab
Check below Specific Runner section. You can copy the token from there.
To register a Runner under Windows run the following command in the path where we install GitLab Runner:./gitlab-runner.exe register
Enter your GitLab instance URL:Please enter the gitlab-ci coordinator URL (e.g. https://gitlab.com)
https://gitlab.com
Enter the token you obtained to register the Runner:Please enter the gitlab-ci token that we copied earlier
Enter a description for the Runner, you can change this later in GitLab’s UI:Please enter the gitlab-ci description for this Runner[hostname] my-runner
Enter the tags associated with the Runner, you can change this later in GitLab’s UI:Please enter the gitlab-ci tags for this Runner (comma separated):docker
Enter the Runner executor:Please enter the executor: ssh, docker+machine, docker-ssh+machine, kubernetes, Docker, parallels, virtualbox, docker-ssh, shell:docker
If you chose Docker as your executor, you’ll be asked for the default image to be used for projects that do not define one in .gitlab-ci.yml:Please enter the Docker image (eg. ruby:2.6):python:2.7
Once the Runner is created successfully, it will be displayed under Settings > CI/CD > Runner > Specific Runner section.
4. Now, Go to CI/CD > Pipelines and Click Run Pipeline Button

It will open a new window. Click Run Pipeline button again.
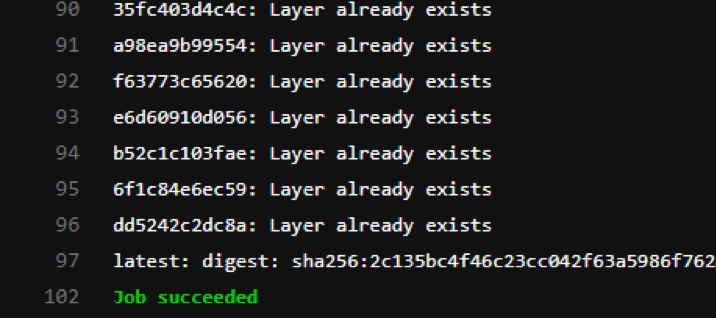
5. Once the job completed successfully, it will be displayed as below.

Share this:
CloudIQ is a leading Cloud Consulting and Solutions firm that helps businesses solve today’s problems and plan the enterprise of tomorrow by integrating intelligent cloud solutions. We help you leverage the technologies that make your people more productive, your infrastructure more intelligent, and your business more profitable.
LATEST THINKING
INDIA
Chennai One IT SEZ,
Module No:5-C, Phase ll, 2nd Floor, North Block, Pallavaram-Thoraipakkam 200 ft road, Thoraipakkam, Chennai – 600097
© 2023 CloudIQ Technologies. All rights reserved.