How to backup and restore Azure Managed Disks using Azure Backup Vault
With an average cost of a data breach at $3.86 million last year, it’s wise to employ a good backup system. More than 80% of the fortune 500 companies use Microsoft Azure for running their businesses effortlessly as they are simple, ever-evolving, secure and cost effective. So, in this article let’s explore how to backup and restore Azure Managed Disks using Azure Backup Vault.
Azure Backup services allow you to back up your data and recover it from the Microsoft Azure cloud. They backup and store the data in the backup vaults. These backup vaults make certain that the backups are successful by monitoring and tracking the storage containers, they optimize the resources by automating maintenance tasks and they also provide better security and access control to store and recover data.
Data sources that are supported by Azure Backup include
- Azure Database for PostgreSQL servers,
- Azure Blobs, and
- Azure Disks.
Prerequisites for performing disk backup and restore operations
Backup Vault’s managed identity needs the below roles to be assigned to it for performing disk backup and restore operations:
- Disk Backup Reader role on the Source disk that needs to be backed up.
- Disk Snapshot Contributor role on the Resource group where backups are created and managed by Azure Backup.
- Disk Restore Operator role on the Resource group where the disk will be restored by the Azure Backup.
To assign Azure roles, the user must have Microsoft.Authorization/roleAssignments/write permissions, such as User Access Administrator or Owner.
Steps to backup managed disks:
Create a Backup vault
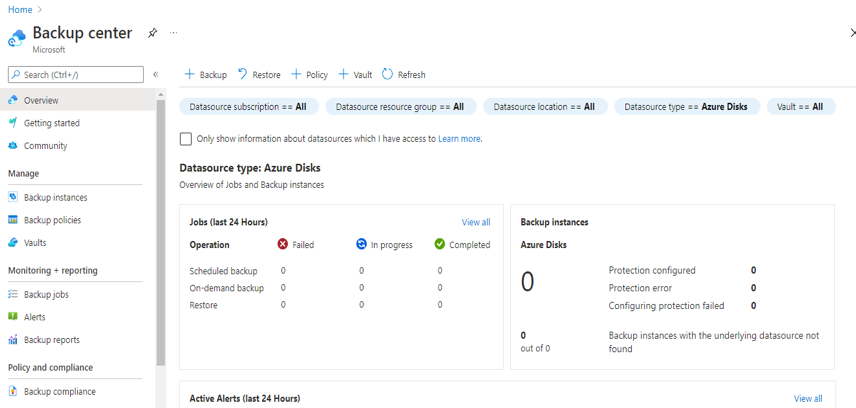
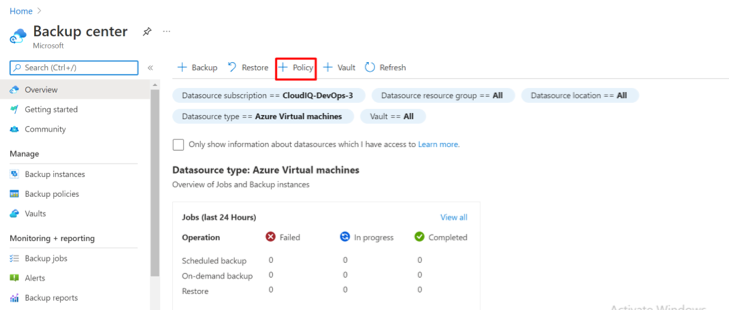
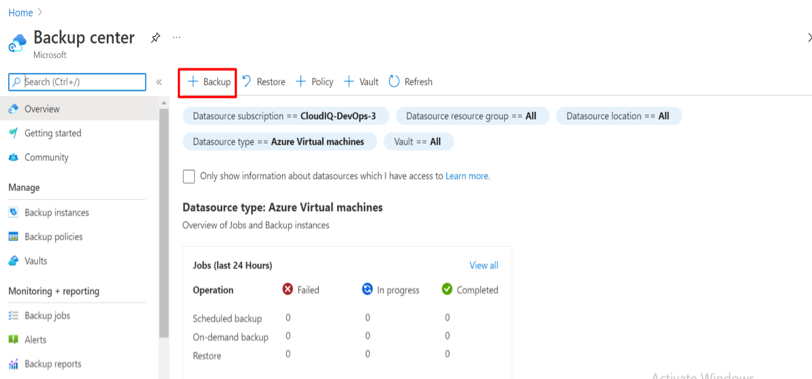
- Go to Backup center service in Azure portal. Backup center enables enterprises to govern, monitor, operate, and analyze backups at scale. Jobs performed in last 24 hours are displayed in the Overview tab. Operations such as Scheduled backup, On-demand backup and Restore are listed along with the status of each operation (Failed, In progress or Completed)
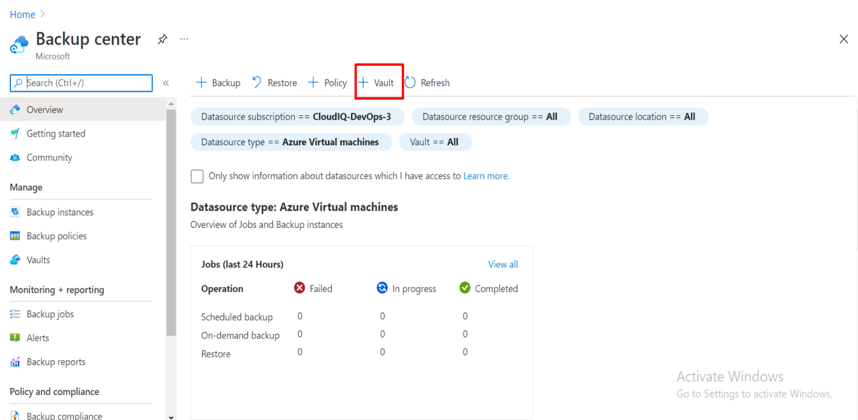
2. Select Vault from the Overview tab
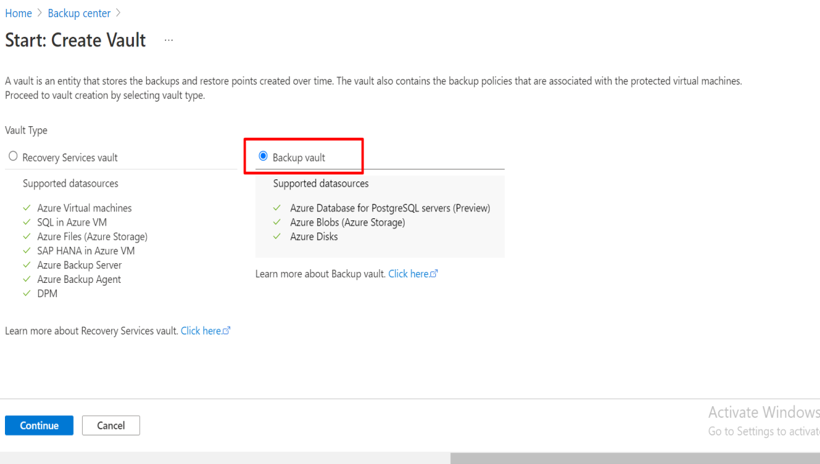
3. In Start: Create Vault page, select Backup vault and then Continue
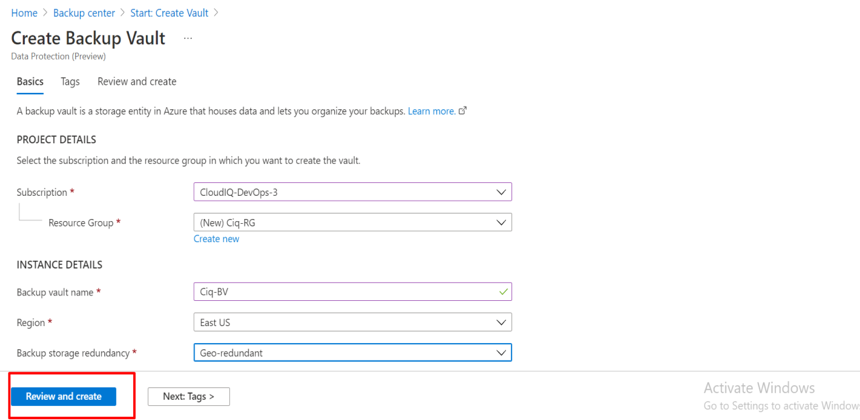
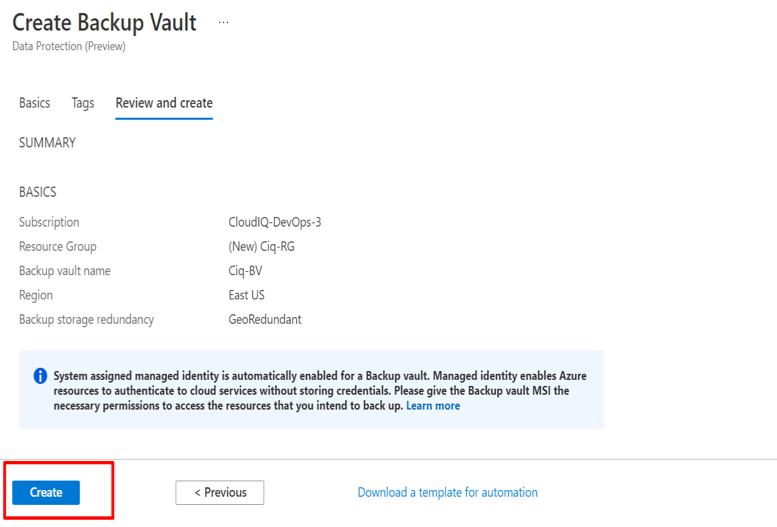
4. In Basics tab,
- Under PROJECT DETAILS, select the Subscription and Resource group of the vault to be created.
- Under INSTANCE DETAILS, type in the Backup vault name.
- Select the region of the backup vault and backup storage redundancy
- Select Review and create
5. Select Create. The Backup vault will be created.
Create a backup policy
- Select Policy from Backup center’s Overview tab
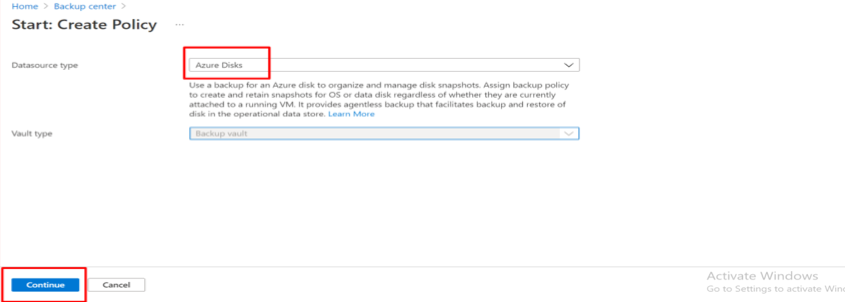
2. In Start: Create Policy page, select Datasource type as Azure Disks and Vault type is prepopulated as Backup vault. Then, select Continue.
3. In the Basics tab, type in the policy name to be created. Select Datasource type as Azure Disk and select Vault as the Backup vault that was just created. Click on Next: Schedule and Retention to go to next tab.

4. In the Schedule and retention tab,
- Under Backup schedule, select the backup schedule frequency and specify the time when backup must happen.
- Specify the number of days backup should be retained under Retention settings.
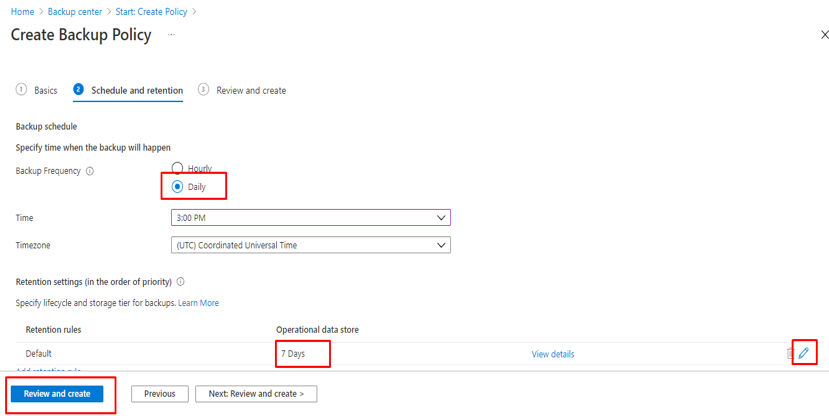
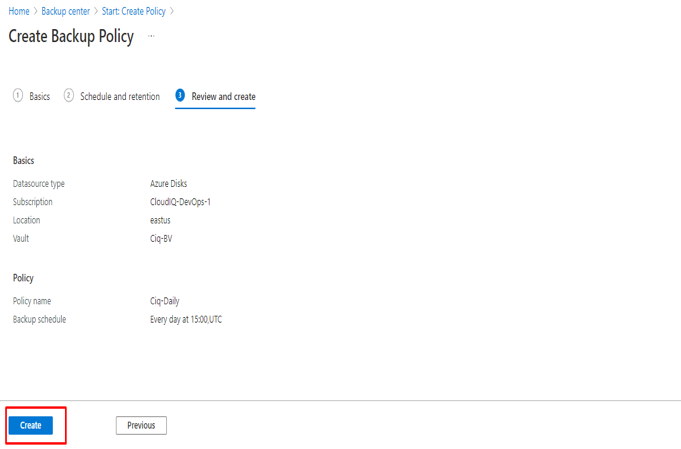
5. After validation, in Review and Create tab, select Create. The Backup policy is created.
Configure backup of an Azure Disk
To backup an azure disk,
- Assign Disk Backup Reader role on the Source disk that needs to be backed up to the Backup vault’s managed identity.
- Assign Disk Snapshot Contributor role on the Snapshot Resource group to the Backup vault’s managed identity.
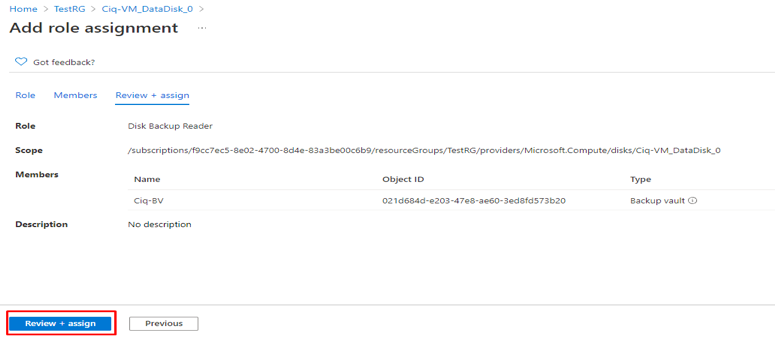
a) Steps to Assign Disk Backup Reader role on the Source Disk
- Go to the source disk that we need to configure backup for.
- Select access control (IAM) and Add role assignment
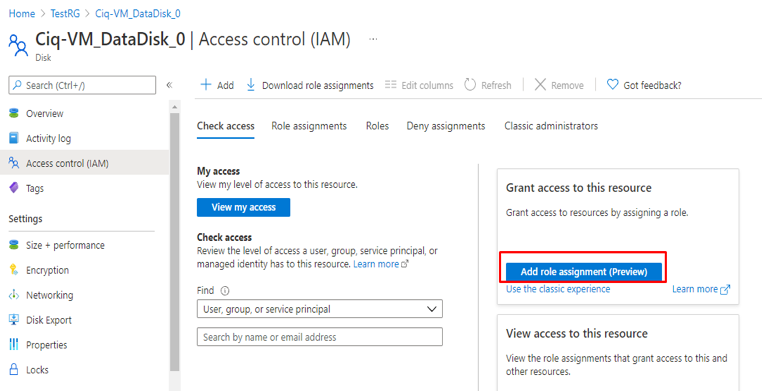
3. In Role tab, search for the role Disk Backup Reader and select it
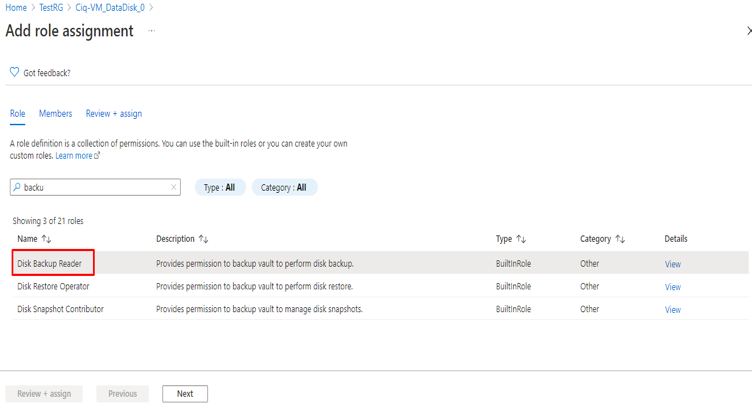
4. In Members tab, select assign access to Managed identity and select members as the Backup vault.
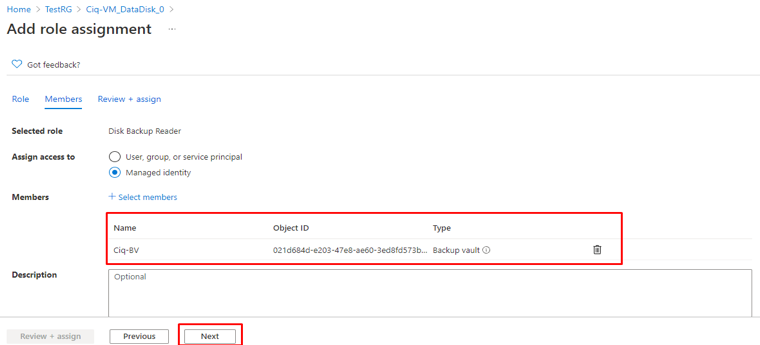
5. Select Review+ assign. Assignment of Disk Backup Reader role to the Backup vault is done.
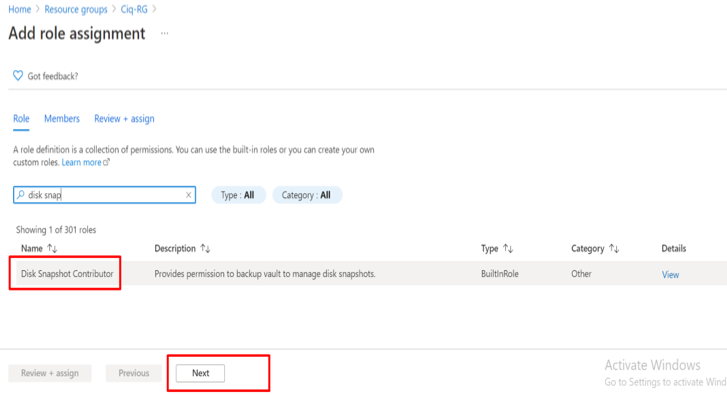
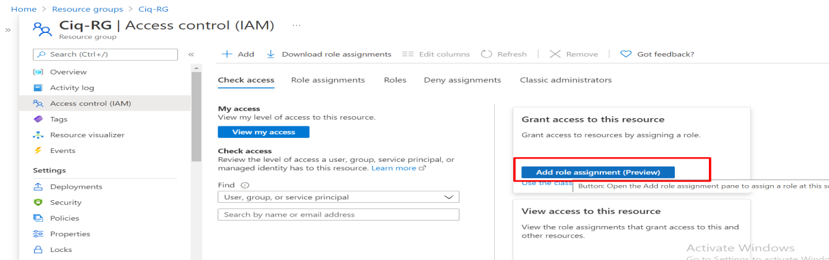
b) Steps to Assign Disk Snapshot Contributor role on the Snapshot Resource group
- Go to the target Snapshot resource group.
- Select access control (IAM) and Add role assignment

3. In Role tab, search for the role Disk Snapshot Contributor and select it
4. In Members tab, select assign access to Managed identity and select members as the Backup vault.
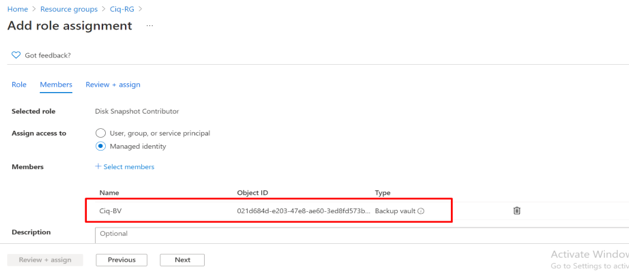
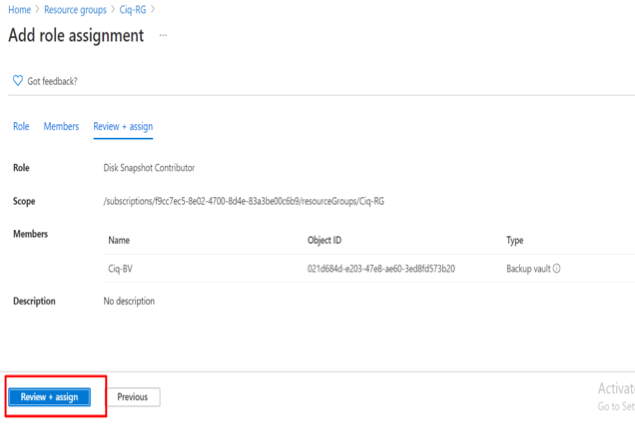
5. Select Review+ assign. Assignment of Disk Snapshot Contributor role to the Backup vault is done.
Steps to Backup an Azure Disk
- In Backup center, Select Backup from the Overview tab
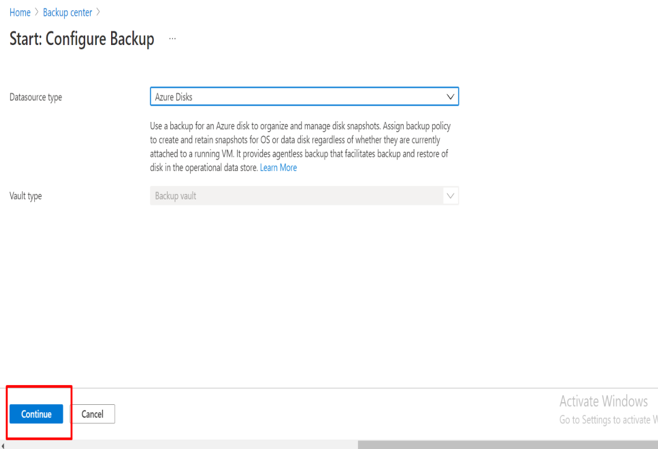
2. In Start: Configure Backup, select Datasource type as Azure Disks and Vault type is prepopulated as Backup vault.
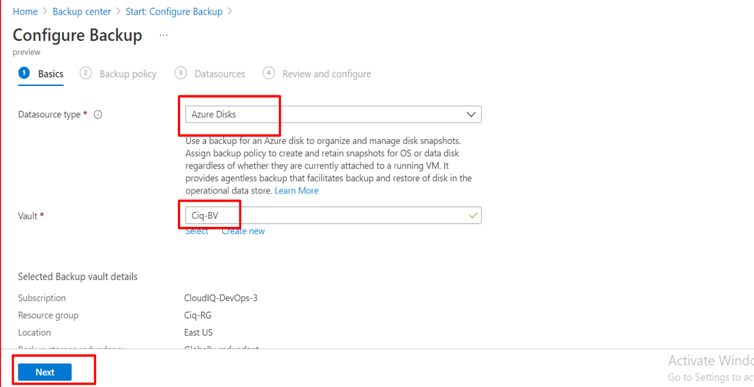
3. In Basics tab, select Datasource type as Azure Disks,select the Vault created and then Next.
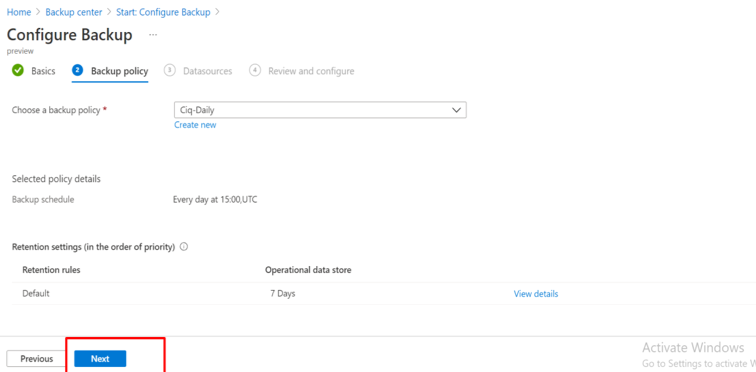
4. In Backup policy tab, Select the backup policy.
5. In Datasources tab:
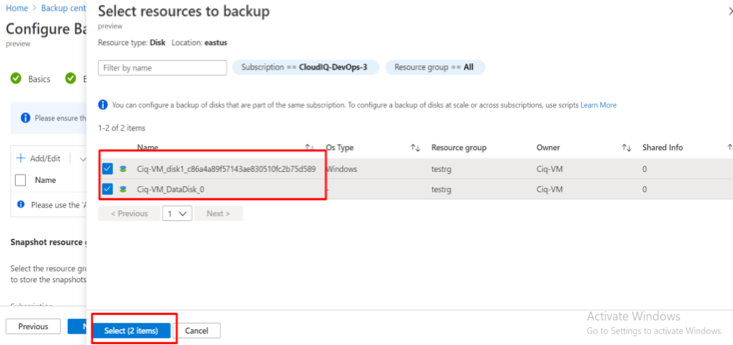
a) Click on Add/Edit and select the disks to backup.
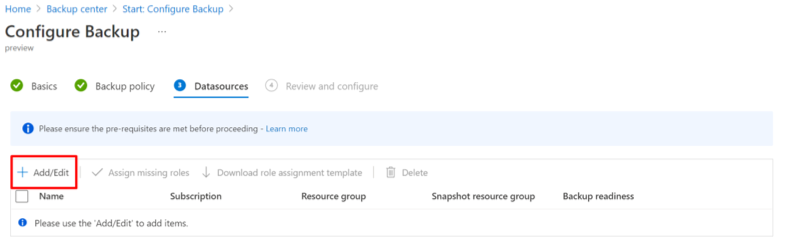
b) Click Select after selection of disks.
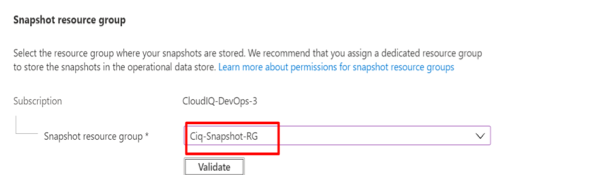
c) Select Snapshot Resource Group, the resource groupwhere snapshots of disks are stored. Once the disk backup is configured, the Snapshot Resource Group that’s assigned to a backup instance cannot be changed.
d) Select Validate. Click Next.
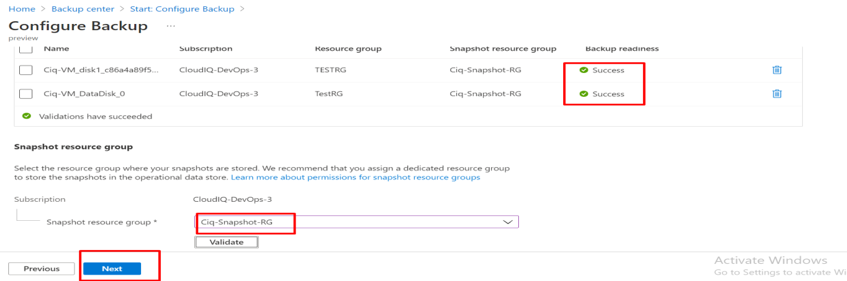
6. In Review and Configure tab, Select Configure Backup. The configuration of backup for the disk is done.
For the validation to be successful, We must assign Disk Backup Reader role on the Source disk that needs to be backed up to the Backup vault’s managed identity and Disk Snapshot Contributor role on the Snapshot Resource group to the Backup vault’s managed identity.
On demand backup of an Azure Disk
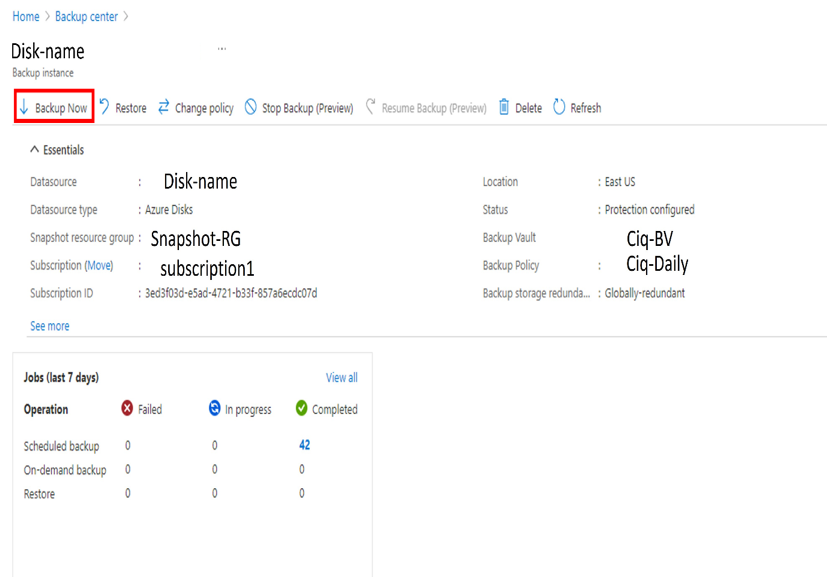
- In the Backup Vault, go to Backup Instances and select the disk to perform on demand backup
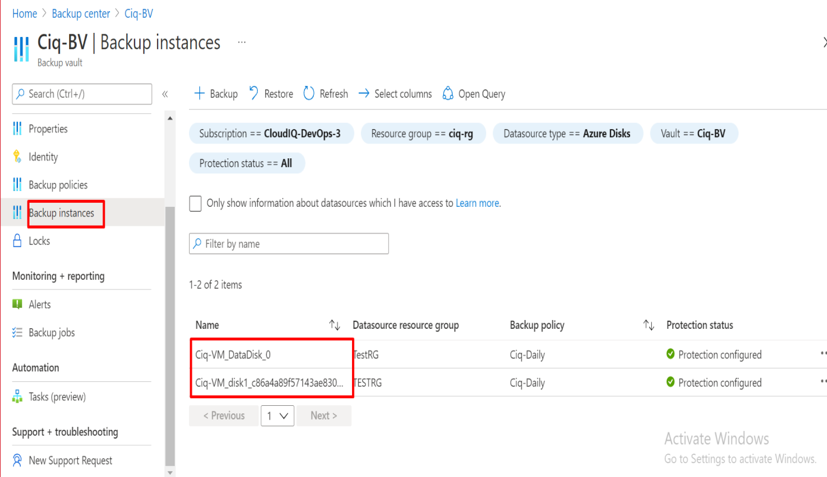
2. Select Backup Now.
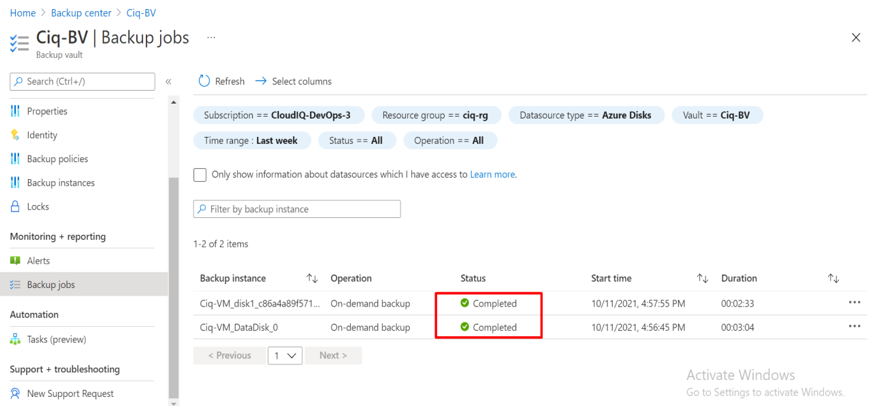
3. In Backup vault, go to Backup jobs to view the status of the backup.
Restore an Azure Disk from backup
To restore an azure disk, we need to assign Disk Restore Operator role to Backup vaults managed identity on the Resource group where the disk will be restored by the Azure Backup.
Steps to Assign Disk Restore Operator role on the Target Resource group
- Go to the target resource group.
- Select access control (IAM) and Add role assignment
3. In Role tab, search for the role Disk Restore Operatorand select it
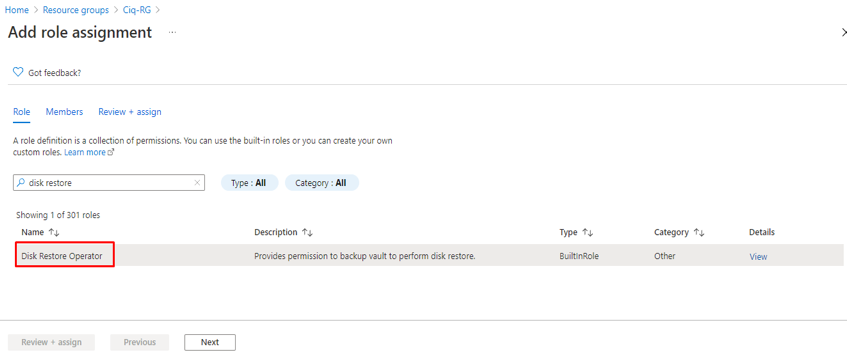
4. In Members tab, select assign access to Managed identity and select members as the Backup vault.
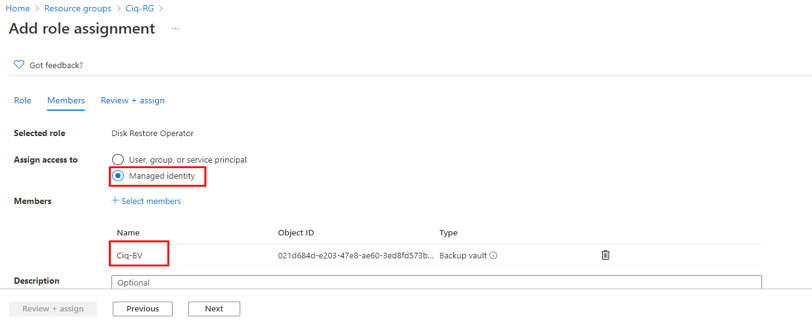
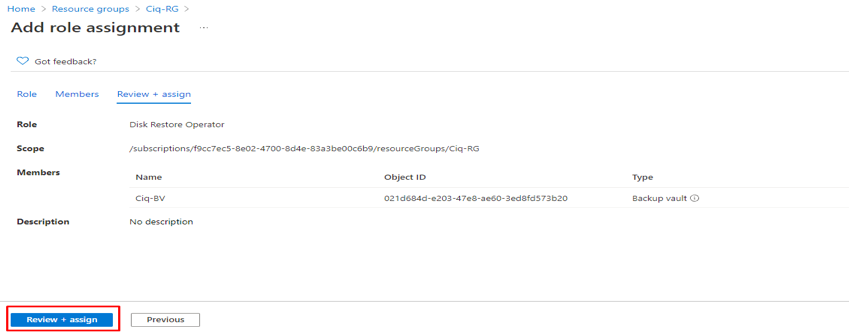
5. Select Review+ assign. Assignment of Disk Restore Operatorrole to the Backup vault is done.
Steps to Restore an Azure Disk
- Go to Backup center -> select Backup vault -> select Restore
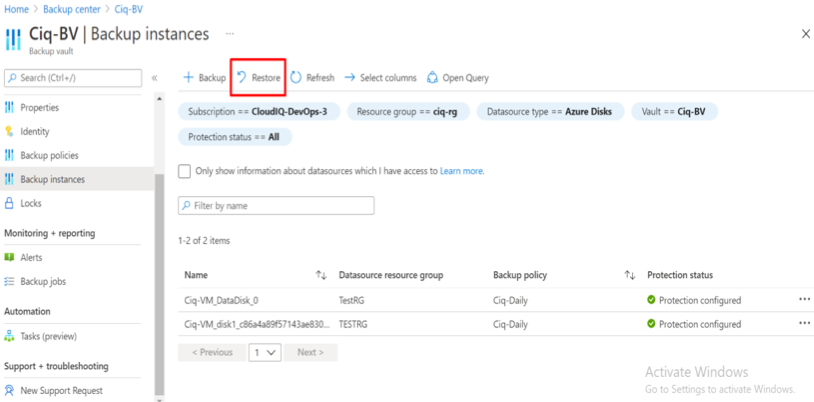
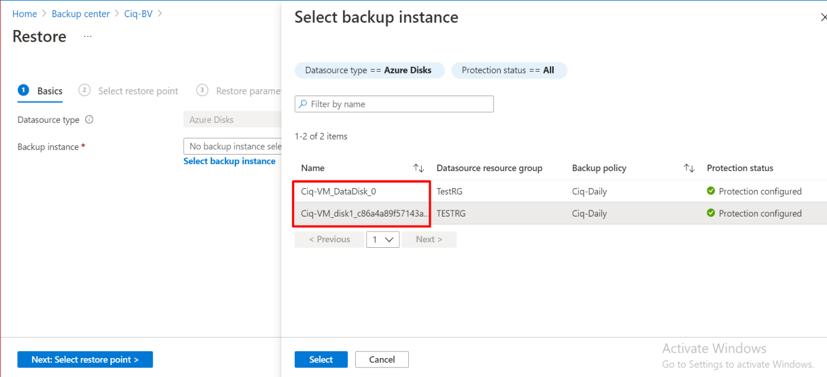
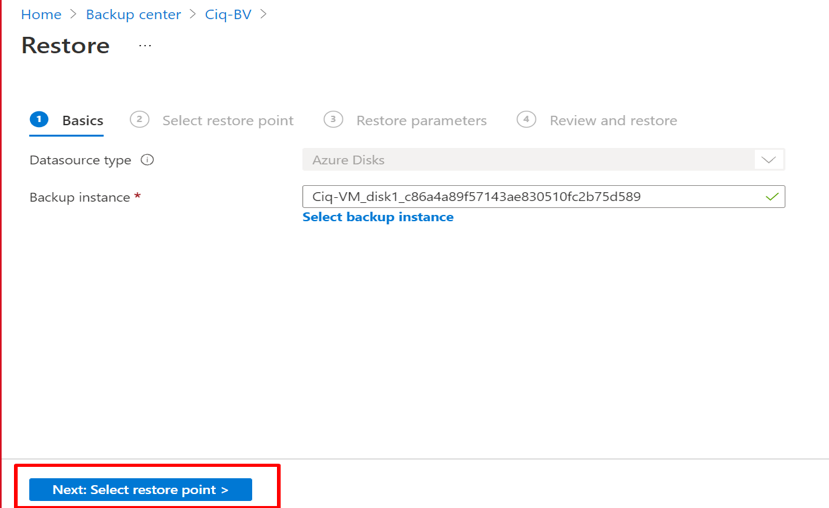
2. In Basics tab, Select the Backup instance as the disk that needs to be restored and then Next.
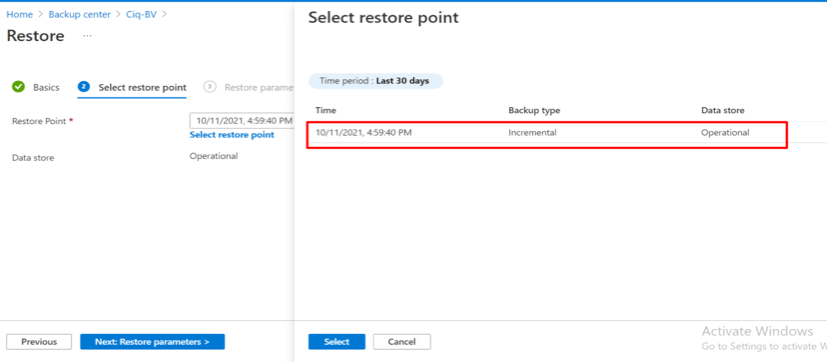
3. In Select Restore Point tab, select the required or latest restore point.
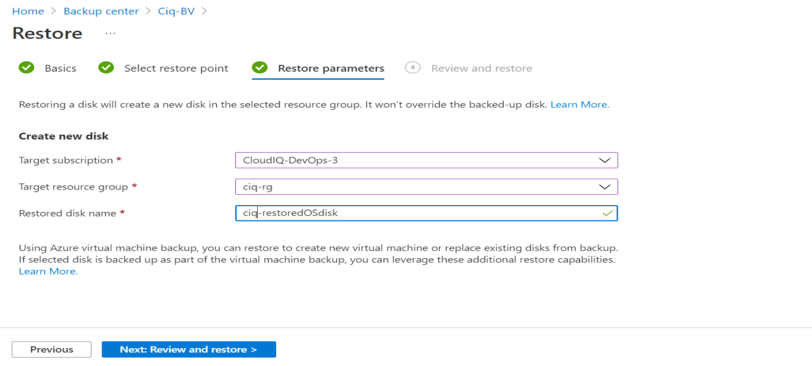
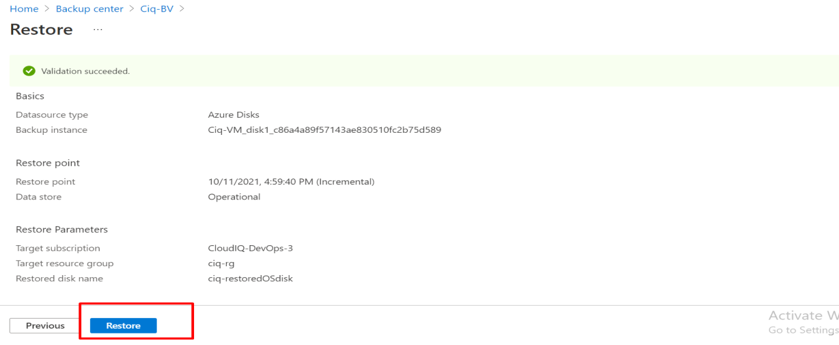
4. In Restore parameters, select Target subscription, and Target resource group. Type in the Restored disk name and select Next:Review and restore.
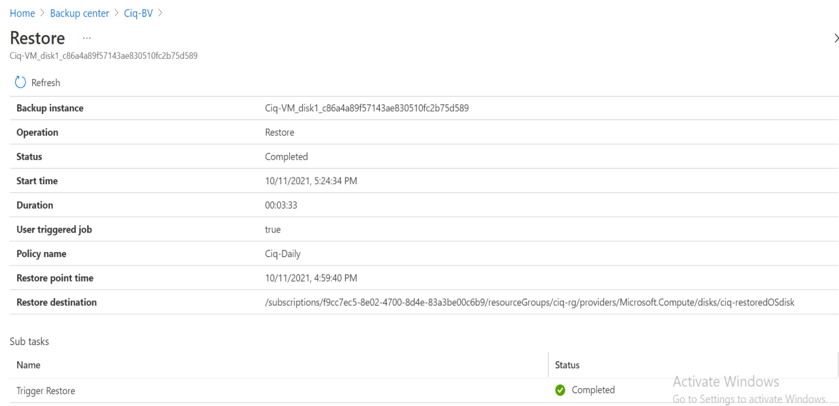
5. After validation, click on Restore. The restore operation is started.
Note: If validation is unsuccessful, follow the steps to Assign Disk Restore Operator role on the Target Resource group.
6. Restore operation is now completed.
Share this:
CloudIQ is a leading Cloud Consulting and Solutions firm that helps businesses solve today’s problems and plan the enterprise of tomorrow by integrating intelligent cloud solutions. We help you leverage the technologies that make your people more productive, your infrastructure more intelligent, and your business more profitable.
LATEST THINKING
INDIA
Chennai One IT SEZ,
Module No:5-C, Phase ll, 2nd Floor, North Block, Pallavaram-Thoraipakkam 200 ft road, Thoraipakkam, Chennai – 600097
© 2023 CloudIQ Technologies. All rights reserved.