

Deploy a Spring-Boot Application in Kubernetes Pod using Jenkins CI/CD Pipeline
Kubernetes has become the preferred platform of choice for container orchestration and deliver maximum operational efficiency. To understand how K8s works, one must understand its most basic execution unit – a pod.
Kubernetes doesn’t run containers directly, rather through a higher-level structure called a pod. A pod has an application’s container (or, in some cases, multiple containers), storage resources, a unique network IP, and options that govern how the container(s) should run.
Pods can hold multiple containers or just one. Every container in a pod will share the same resources and network. A pod is used as a replication unit in Kubernetes; hence, it is advisable to not add too many containers in one pod. Future scaling up would lead to unnecessary and expensive duplication.
To maximize the ease and speed of Kubernetes, DevOps teams like to add automation using Jenkins CI/CD pipelines. Not only does this make the entire process of building, testing, and deploying software go faster, but it also minimizes human error. Here is how Jenkins CI/CD pipeline is used to deploy a spring boot application in K8s.
TASK on Hand:
Create a Jenkins pipeline to dockerize a spring application, build docker image, push it to the dockerhub repo and then pull the image into an AKS cluster to run it in a pod.
Complete repository:
All the files required for this task are available in this repository:
https://github.com/saiachyuth5/simple-spring
Pre-Requisites:
A spring-boot application, dockerfile to containerize the application.
STEPS:
1. Install Jenkins :
- Before you install Jenkins, make sure the system has Java 8 as the default java compiler, as Jenkins does not support Java 7.
- Follow the steps given in the link: https://www.digitalocean.com/community/tutorials/how-to-install-jenkins-on-ubuntu-16-04
- Install the suggested plugins and install the Azure Container Services plugin, to connect Jenkins to your AKS cluster.
2. Connect host docker daemon to Jenkins:
- Make sure docker is running on port 4243, and expose the port 4243. Follow this link to expose docker :
https://success.docker.com/article/how-do-i-enable-the-remote-api-for-dockerd
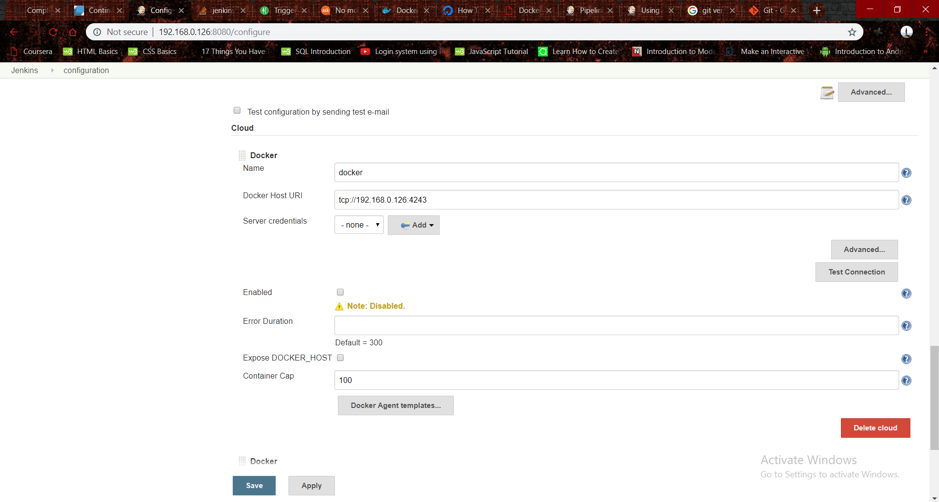
- Run the command: chmod –R Jenkins:docker filename/foldername to allow Jenkins to access docker.
- Go to manage Jenkins from browser >Configure System and scroll to the bottom
- Click the dropdown ‘add cloud’ and add Docker. Add the docker host URI in the format tcp://hostip:4243
- Click verify connection to check your connection. If everything was done right, the docker version is displayed.
3. Adding global credentials:
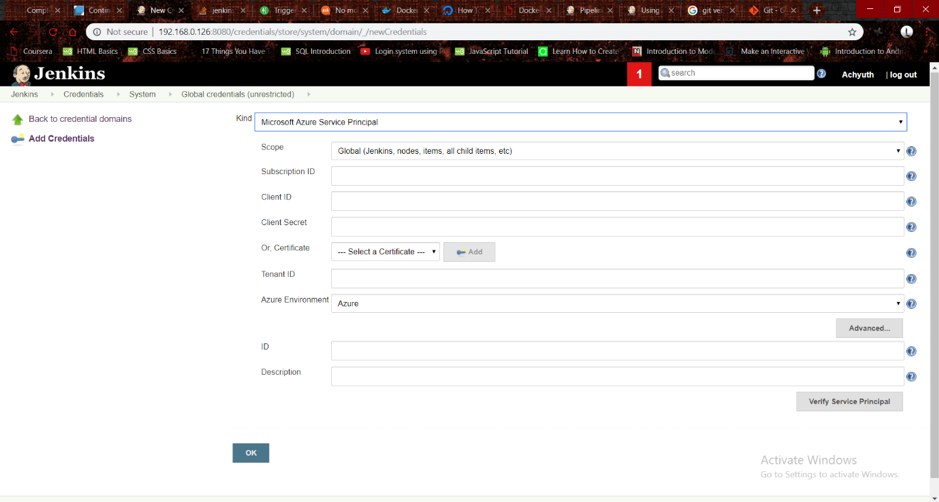
- Go to Credentials on the Jenkins dashboard, click global credentials, and then Add credentials.
- Select the kind as Microsoft Azure Service Principal and enter the required ids, similarly save the docker credentials under type username with password.
4. Create the Jenkinsfile :
- Refer to the official Jenkins documentation for the pipeline syntax, usage of Jenkinsfile, and simple examples.
- Below is the Jenkinsfile used for this task.
Jenkinsfile:
NOTE: While this example uses actual id to login to Azure, its recommended to use credentials to avoid using exact parameters.
pipeline {
environment {
registryCredential = "docker"
}
agent any
stages {
stage(‘Build’) {
    steps{
    script {
        sh 'mvn clean install'
    }
    }
}
stage(‘Load’) {
    steps{
    script {
        app = docker.build("cloud007/simple-spring")
    }
    }
}
    stage(‘Deploy’) {
    steps{
    script {
        docker.withRegistry( "https://registry.hub.docker.com", registryCredential ) {
        // dockerImage.push()
        app.push("latest")
        }
    }
    }
}
stage('Deploy to ACS'){
    steps{
        withCredentials([azureServicePrincipal('dbb6d63b-41ab-4e71-b9ed-32b3be06eeb8')]) {
        sh 'echo "logging in" '
        sh 'az login --service-principal -u **************************** -p ********************************* -t **********************************’
        sh 'az account set -s ****************************'
        sh 'az aks get-credentials --resource-group ilink --name    mycluster'
        sh 'kubectl apply -f sample.yaml'
    }
}
}
}
}
5. Create the Jenkins project:
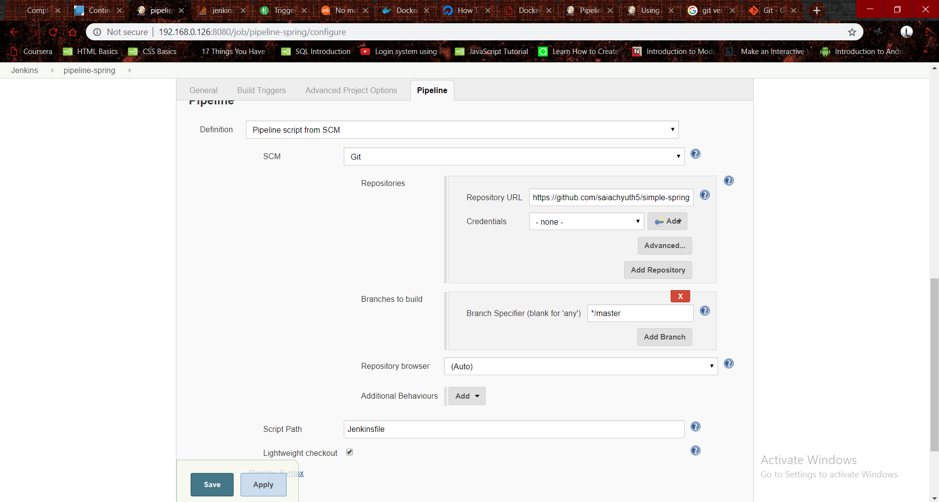
- Select New view>Pipeline and click ok.
- Scroll to the bottom and select the definition as Pipeline from SCM.
- Select the SCM as git and enter the git repo to be used, path to Jenkinsfile in Script path.
- Click apply, and the Jenkins project has now been created.
- Go to my views, select your view, and click on build to build your project.
6. Create and connect to Azure Kubernetes cluster:
- Create an Azure Kubernetes cluster with 1-3 nodes and add its credentials to global credentials in Jenkins.
- Install azure cli on the Jenkins host machine.
- Use shell commands in the pipeline to log in, get-credentials, and then create a pod using the required yaml file.
YAML used:
apiVersion: apps/v1
kind: Deployment
metadata:
    name: spring-helloworld
spec:
    replicas: 1
    selector:
    matchLabels:
        app: spring-helloworld
    template:
    metadata:
        labels:
        app: spring-helloworld
    spec:
        containers:
        - name: spring-helloworld
        image: cloud007/simple-spring:latest
        imagePullPolicy: Always
        ports:
        - containerPort: 80
Here are some common problems faced during this process and the troubleshooting procedure.
- Corrupt Jenkins exec file:
Solved by doing an apt-purge and then apt-install Jenkins. - Using 32-bit VM:
Kubectl is not supported on a 32-bit machine and hence make sure the system is 64-bit. - Installing azure cli manually makes it inaccessible for non-root users
Manually installing azure cli placed it in the default directories, which were not accessible by non-root users and hence by Jenkins. So, it is recommended to install azure cli using apt. - Installing minikube using local cluster instead of AKS:
Virtual box does not support nested VTx-Vtx virtualization and hence cannot run minikube. It is recommended to enable Hyperv and use HyperV as the driver to run minikube. - Naming the stages in the Jenkinsfile:
Jenkins did not accept when named stage as ‘Build Docker Image’ or multiple words for some reason. Use a single word like ‘Build’, ‘Load’ etc… - Jenkins stopped building the project when the system ran out of memory:
Make sure the host has at least 20 GB free in the hard disk before starting the project. - Jenkins couldn’t execute docker commands:
Try the command usermog –a –G docker Jenkins - Spring app not accessible from external IP:
Created a new service with type loadbalancer, assigned it to the pod, and the application was accessible from this new external ip.
In an upcoming article we will show you how to deploy a pod containing three applications using Jenkins ci/cd pipeline and update them selectively.
Share this:

CloudIQ is a leading Cloud Consulting and Solutions firm that helps businesses solve today’s problems and plan the enterprise of tomorrow by integrating intelligent cloud solutions. We help you leverage the technologies that make your people more productive, your infrastructure more intelligent, and your business more profitable.
LATEST THINKING
INDIA
Chennai One IT SEZ,
Module No:5-C, Phase ll, 2nd Floor, North Block, Pallavaram-Thoraipakkam 200 ft road, Thoraipakkam, Chennai – 600097
© 2023 CloudIQ Technologies. All rights reserved.