


Automation Testing helps complete the entire software testing life cycle (STLC) in less time and improve efficiency of the testing process.
Test Automation enables teams to verify functionality, test for regression and run simultaneous tests efficiently. In this article we will take a detailed look at the Automation Testing Tools available, standards and best practices to be followed during Test Automation.
Following the best practices for Software Testing Life Cycle (Unit testing, Integration Testing & System Testing) ensures that the client gets the software as intended without any bugs. End-to-end testing is the methodology used to test whether the flow of an application is performing as designed from start to finish. Carrying out end-to-end tests helps identify system dependencies and ensure the flow of right information across various system components and the system.
Ultimately Automation Testing increases the speed of test execution and the test coverage.
When to Choose Automation Testing
- There is lots of regression work
- GUI is same, but you have lot of often functional changes
- Requirements do not change frequently
- Load and performance testing with many virtual users
- Repetitive test cases that tend well to automation & saves time
- Huge projects
- Projects that need to test the same areas
Steps to Implement Automation Testing
- Identify areas within software to automate
- Choose the appropriate tool for test automation
- Write test scripts
- Develop test suits
- Execute test scripts
- Build result reports
- Find possible bugs or performance issues
Choosing your Automation Testing Tool
The strategy to adopt test automation should clearly define when to opt for automation, its scope and selection of the right kind of tools for execution. And when it comes to tools the top ones to go for are
- Cypress
- Selenium
- Protractor
- Appium(Mobile)
Why Cypress?
Cypress is a JavaScript based testing framework built for the modern web. Cypress helps to create End-to-end tests, Integration tests and Unit tests. Cypress takes a different approach compared to other testing frameworks, since it’s executed in the same run loop as the application. It also leverages a Node.js server to handle any task that needs to happen outside of the browser. With its ability to understand everything happening inside and outside of the browser, it produces more consistent results.
Key Features of Cypress
- Automatic Waiting – No need for adding wait and sleep.
- Spies, Stubs, and Clocks – Verify and control the behaviour of functions, server responses, or timers.
- Network traffic control and monitoring – Easily control, stub, and test edge cases without involving your server. You can stub network traffic however you like.
- Consistent Results – Cypress architecture doesn’t use Selenium or WebDriver. It is fast, consistent and does reliable tests that are flake-free.
- Screenshots and Videos – View screenshots taken automatically on failure, or videos of your entire test suite when run from the CLI.
Azure CICD Setup with Cypress
Cypress runs on most of the following CI providers.
Azure DevOps / VSTS CI / TeamFoundation
BitBucket
CircleCI
Docker
GitLab
Jenkins
TravisCI
Azure DevOps – Steps to Integrate Cypress Automation Tests
- Pre-Build Testing
- Install the Node module and run application in test mode
- Run the tests
- Publish the test results
- Cypress Containerization
- Build the docker container of cypress
- Push the image to container
- Publish the Build
Before we get started here are the basic Cypress installation commands
Clean up the old results
$ rm -rf cypress/reports/

Run the cypress application with required spec file.
$ cypress run –spec \”cypress/integration/**/*.spec.ts\” // mention your spec file

Configure the mocha reports path for publishing test results.
–reporter junit –reporter-options ‘mochaFile=cypress/reports/test-output-[hash].xml,toConsole=true’

Uninstall the application.
$ npm uninstall cypress-multi-reporters; npm uninstall cypress-promise; npm uninstall cypres
Pre-Build Testing
It is critical to test the application before the Build, Deployment or Release. Essentially the process involves regression and smoke testing. And don’t forget the sanity checks before the build is deployed in the staging environment.
Cypress comes in handy for testing angular / JavaScript applications before they are deployed to staging or production environment.
Install the Node module and run application in test mode
Install the required node module of the application then run the application with test mode.
$ npm install –save-dev start-server-and-test
$ start-server-and-test start http://localhost:4200
Publish the test results
The results of the Cypress test execution are stored in specified path and are added to the Azure DevOps test results. Cypress supports JUnit, Mocha, Mochawsome test results reporter formats and provides options to create customised test results and merge all the test results as well.
Cypress Containerization
Cypress supports docker containerization and that makes it easy to set it up in a cluster environment like AKS. The Cypress base images are available at the link below.
https://github.com/cypress-io/cypress-docker-images
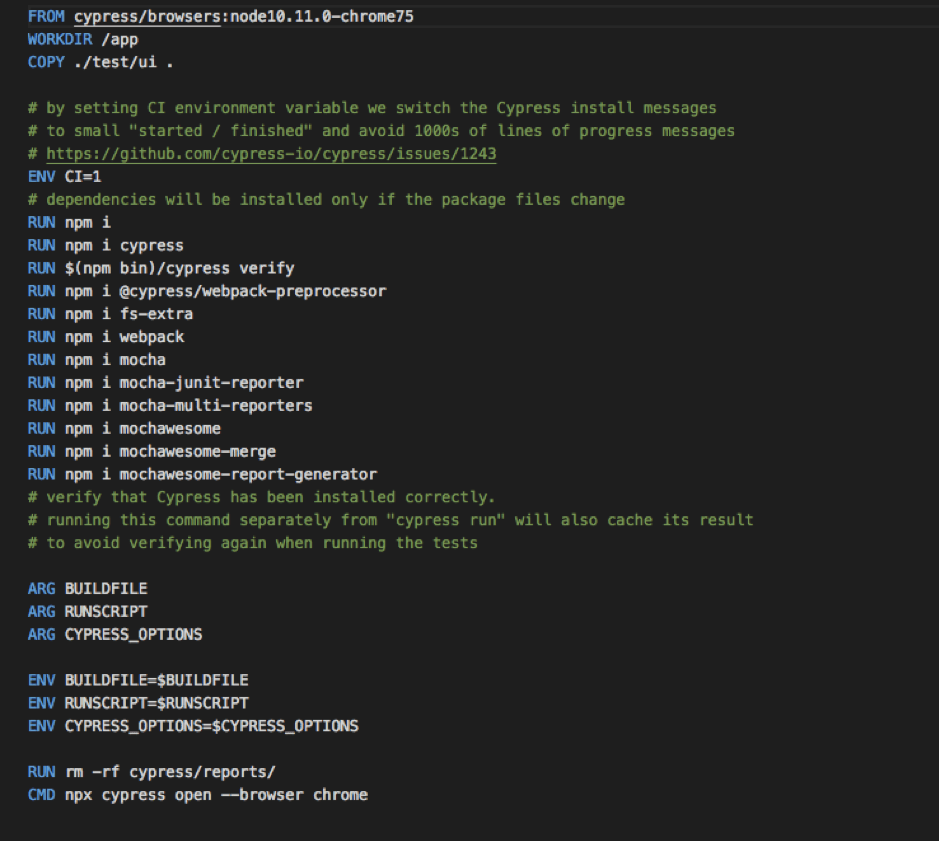
Copy the package.json and UI source code to the app folder and run the Cypress test. The following commands are used to run the docker and execute.
  script: |
        docker run -d -it --name cypressName:cypressImageTag bash
        docker commit -p cypressName:cypressImageTag
        docker stop cypressName
        docker rm -f cypressName

    - script: docker tag cypressName:cypressImageTag
      displayName: Tag Cypress image


    - task: Docker@1
    displayName: Push image To Registry
    inputs:
        command: push
        azureSubscriptionEndpoint: azureSubscriptionEndpoint
        azureContainerRegistry: $(azureContainerRegistry)
        imageName: acrImageName:BuildId

    - script: sudo rm -rf /test-results/*
    displayName: Removing Previous Results

    - task: ShellScript@2
    displayName: 'Bash Script - cypress base image post-deployment'
    inputs:
        scriptPath: ./cypress-deployment.sh
        args: $(azureRegistry) $(cypressImageName) $(azureContainerValue) $(CYPRESS_OPTIONS)
        continueOnError: true
    - task: PublishTestResults@1
    displayName: 'Publish Test Results ./test-results-*.xml'
    inputs:

    cypress-base-image-post-deployment.sh

    docker run -v $systemSourceDirectory:/app/cypress/reports --name vca-arp-ui
    $cypress_Latestimage npx cypress run $cypressOptions bash
Now the container should be set up on on your local machine and start running your specs.
Cypress is simple and easily integrates with your CI environment. Apart from the browser support, Cypress reduces the efforts of manual testing and is relatively faster when compared to other automation testing tools.
Share this:

CloudIQ is a leading Cloud Consulting and Solutions firm that helps businesses solve today’s problems and plan the enterprise of tomorrow by integrating intelligent cloud solutions. We help you leverage the technologies that make your people more productive, your infrastructure more intelligent, and your business more profitable.
LATEST THINKING
INDIA
Chennai One IT SEZ,
Module No:5-C, Phase ll, 2nd Floor, North Block, Pallavaram-Thoraipakkam 200 ft road, Thoraipakkam, Chennai – 600097
© 2023 CloudIQ Technologies. All rights reserved.